Doors dismantled...
(Note: I wrote this for the Tasmin, last century sometime...!)
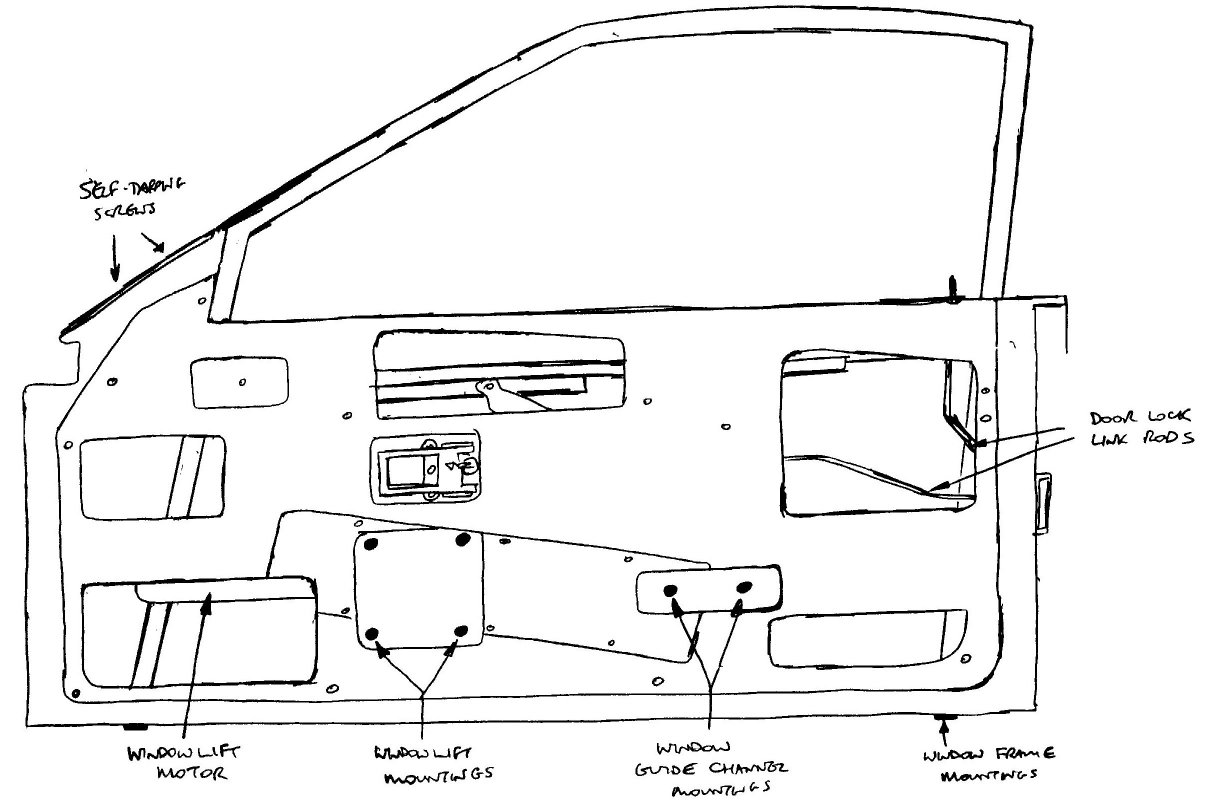
The doors on the Tasmin fixed-head coupe are constructed as follows (the drop-head being similar and differing mainly in the construction of the door glass frame).A substantial framework of steel box section is welded to the vertical hinge tube at the leading edge of the door. The frame pivots around a 1/2" steel rod, using plastic bushes pressed into the top and bottom of the hinge tube. The steel rod is supported at each end by an angled steel bracket, bolted through the GRP bodywork to a reinforcing tube inside the car. The lower end of this tube is bolted to the chassis.The door shell itself (made from two GRP sections joined together) is simply slid over the steel framework and secured at leading edge by two bolts, and trailing edge by two screws. The door catch mechanism is held by screws through the trailing edge of the door and the framework inside it. A guide/ support frame for the door glass, fabricated from lengths of channel, is lowered into the door and held in place by two bolts through the door bottom, and three self-tapping screws through the triangular plate at the front of the frame. A length of angle connects the front and rear upright sections of the frame, and a simple felt-covered draught-excluder strip is clipped to the lower edge of the angle, inside the door. The door glass channel is fitted with a velvet-covered rubber liner to allow the glass to slide smoothly and quietly. (On the DHC the frame is essentially two separate runners, at front and rear of glass. The front one is fabricated with the triangular fillet plate at top front of door.)
The window-lift motor assembly is bolted to the inside of the square recess in the door (4 bolts), and rearward of this is another recess to which another pivot for the window-lift is secured (2 nuts). Note that the drop-head has an adjustable travel limit for the glass: this is a simple Bowden cable affair (suspiciously similar to the brake cables on a bicycle!) that is anchored to the rear glass channel lower mounting by a steel bracket.The internal and external door catch releases (and the lock button) are connected to the catch with simple steel rod linkages; the internal release being located in the recess just above the window-lift motor mountings. Various access holes in the inner face of the door shell are closed off with sheets of polythene, glued around their perimeters. The armrest/ doorpull is held in place in the sloping rectangular recess by six countersunk self-tappers (the doorpull being retained to the armrest by Nyloc nuts which are accessible once the armrest assembly is off the door).
If the car has the 'aerodynamic' mirror pods fitted, the mounting screws for the pod are hidden by the triangular section at top front of the door trim panel.
Interior trimming of the door is performed on the early cars by two panels, the upper in vinyl-clad GRP and the lower made from hardboard covered in velour material. Both panels are secured by plastic clips at various points around their perimeters, which fit into holes in the door shell. Later cars had a one-piece GRP panel with a ‘bulging’ armrest. Initially the door release on this was in a similar position to the early cars (although a Metro release was used to drag the aesthetics into the '80s!) but for all late production the door release moved to a tidier location behind the door pull. The panel may be just a tight push-fit on the door, or may have some fixing screws at its lower edge. Finally, the door-release trim plate and the ashtray are screwed into place and the door lock button pressed onto the end of its control rod. Later cars had the ashtray in the centre console, of course, and as an aside the console ashtray was identical to that used in the DeLorean DMC12 (it's also similar but not identical to a Porsche item).
POINTS TO NOTE
1. The frame in which the door glass slides on the FHC is prone to rot. Originally plastic-coated. Expensive (£350+ from the factory in 1997) and not guaranteed to fit anyway. The felt/ rubber wiper along the inside of the horizontal rail (FHC) falls apart and drops off. This was apparently not intended as a water repelling device, water being allowed to run into the door and find it's own way out of two holes drilled in the lower surface of the door. A suitable replacement for the felt-covered original may be hard to come by. A suggested modification has been to glue a length of 'traditional' rubber window seal along the top outer face of the angle, such that water running down the glass is scraped off onto the top of the door, but this may not be cosmetically acceptable. (Later DHC cars sometimes have a length of door rubber trim fitted to a GRP lip here to help clear the glass.)
2. Window-lift motors are very torquey, and can strip the toothed quadrant gear or cause the four assembly mounting holes to open out or become slotted. In extreme cases, the corners of the window-lift mounting recess may be broken away, necessitating some GRP work.
3. The steel framework inside the door should need little attention as long as it is not rusting, or damaged in an impact. The frames appear to have been bolted to the car when it was originally sprayed, as the body colour extends part way along the frame section which is inside the door. This may be a useful indication of a car's original colour. Open the door and identify the plastic bushes, steel washers and Nyloc nuts at the top and bottom hinge plates. When you move the door, the bushes should rotate with the pivot tube, but everything else should stay still. If the nuts and washers move, the pivot rod has seized into the bushes and will wear the holes in the hinge brackets oversize, allowing the door to drop.
4. The doorpulls on early cars are hardwood lengths veneered in walnut. Veneer on the door pulls is affected (like the rest of the interior woodwork) by temperature, humidity and flexing of the 'ground' wood when pulled. Usually the plastic lacquer cracks first (which is unsightly anyway), then the 1mm or so veneer is affected directly. Original doorpulls have serial numbers stamped on their backs and were presumably made in pairs, although a 'true' matched pair would traditionally be made by covering each piece with consecutive sheets of the veneer, so a 'mirror-image' effect results. Whether TVR were ever so critical about this is uncertain. Although one could obviously make some simple replacements from solid pieces of hardwood, the result would probably not be as pleasing as the 'real thing'. Re-veneering is available, although some specialists insist on having all of the car's woodwork to work with, so that colour or grain differences can be minimised… usually by re-veneering everything. Later cars (with the ‘bulging’ arm-rests) use a simpler doorpull - and 'fake' veneer that is basically vinyl-clad wood. On these cars there is also usually a slim ‘veneered’ strip along the inner door panel that drops to pieces.
5. The early upper (GRP) trim panel for the door can suffer from cracking if care is not taken when fitting. Lower the door glass and locate the front end of the trim panel over the door top edge, then swing the trim down at the rear, feeding the lock control rod through it's hole before thumping the plastic clips into place
6. Avoid using excess force on the screw which secures the internal release trim, as the plastic is brittle and will crack around the mounting hole, causing the trim to fall off. Difficult to repair and hard to find in breakers' yards now. It probably goes without saying, but the hardwood lower trim panel on the early cars is not the best mounting point for loudspeakers, even if you are completely undemanding of audio quality. Apart from the lack of rigidity which high-output speakers need, the amount of water that enters the door will soon destroy the speaker cones. Later cars incorporated a GRP drip guide that direct the water away from the speakers, and the later GRP door panel is also more rigid, but it’s as well to be aware of the pitfalls before spending your money on Pioneer’s finest.
7. The steel reinforcing posts fitted inside the ‘A’ and ‘B’pillars are bolted through the GRP shell to the sill plates. A length of plate is welded to the bottom of the tube and bent to conform to the sill angle. This plate is the first bit to corrode, usually along with the outer sill plates and the chassis tubes! Once it rusts through, the door pillars have less strength, as they are basically relying on the GRP to hold everything together. If you find that the sill tubes and/or plates need repair, it’s as well to check these reinforcements as well.
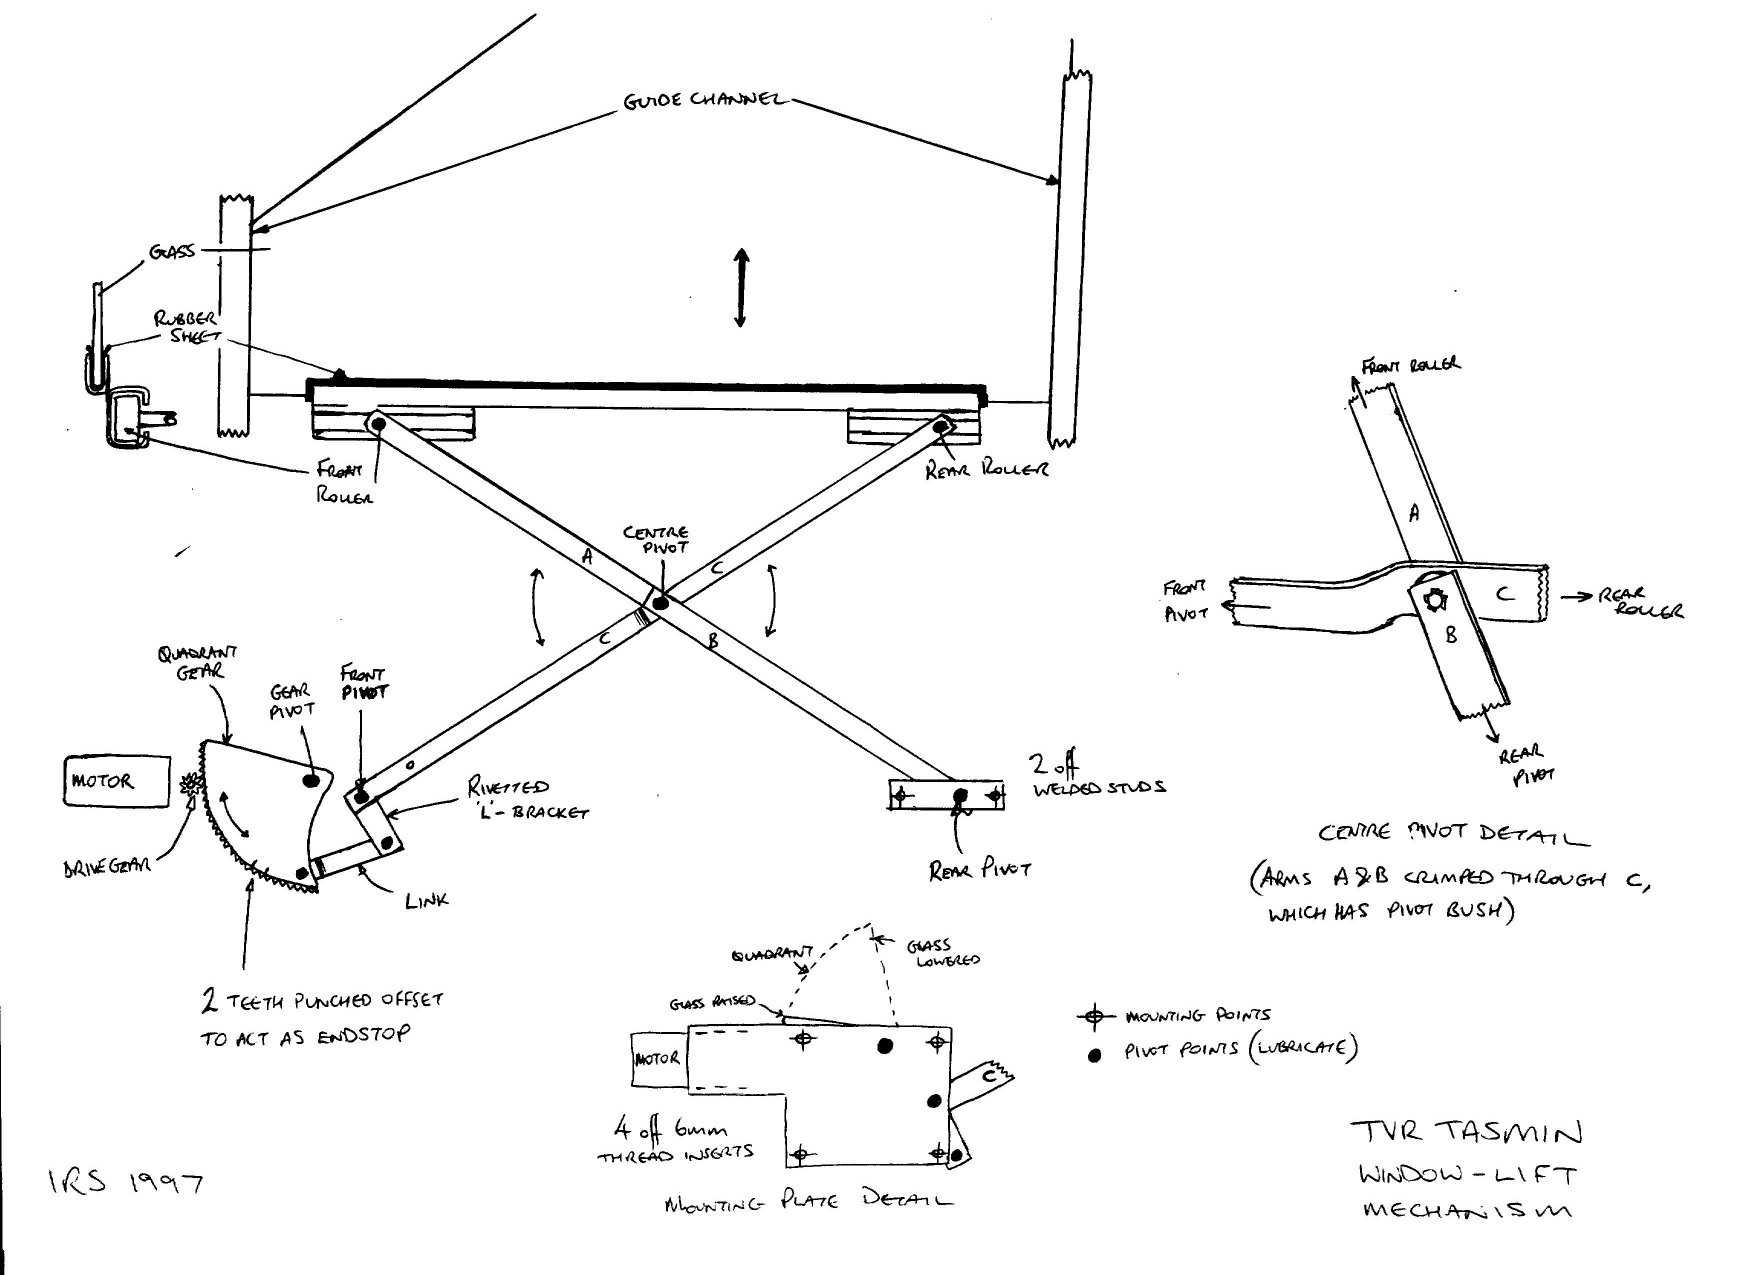
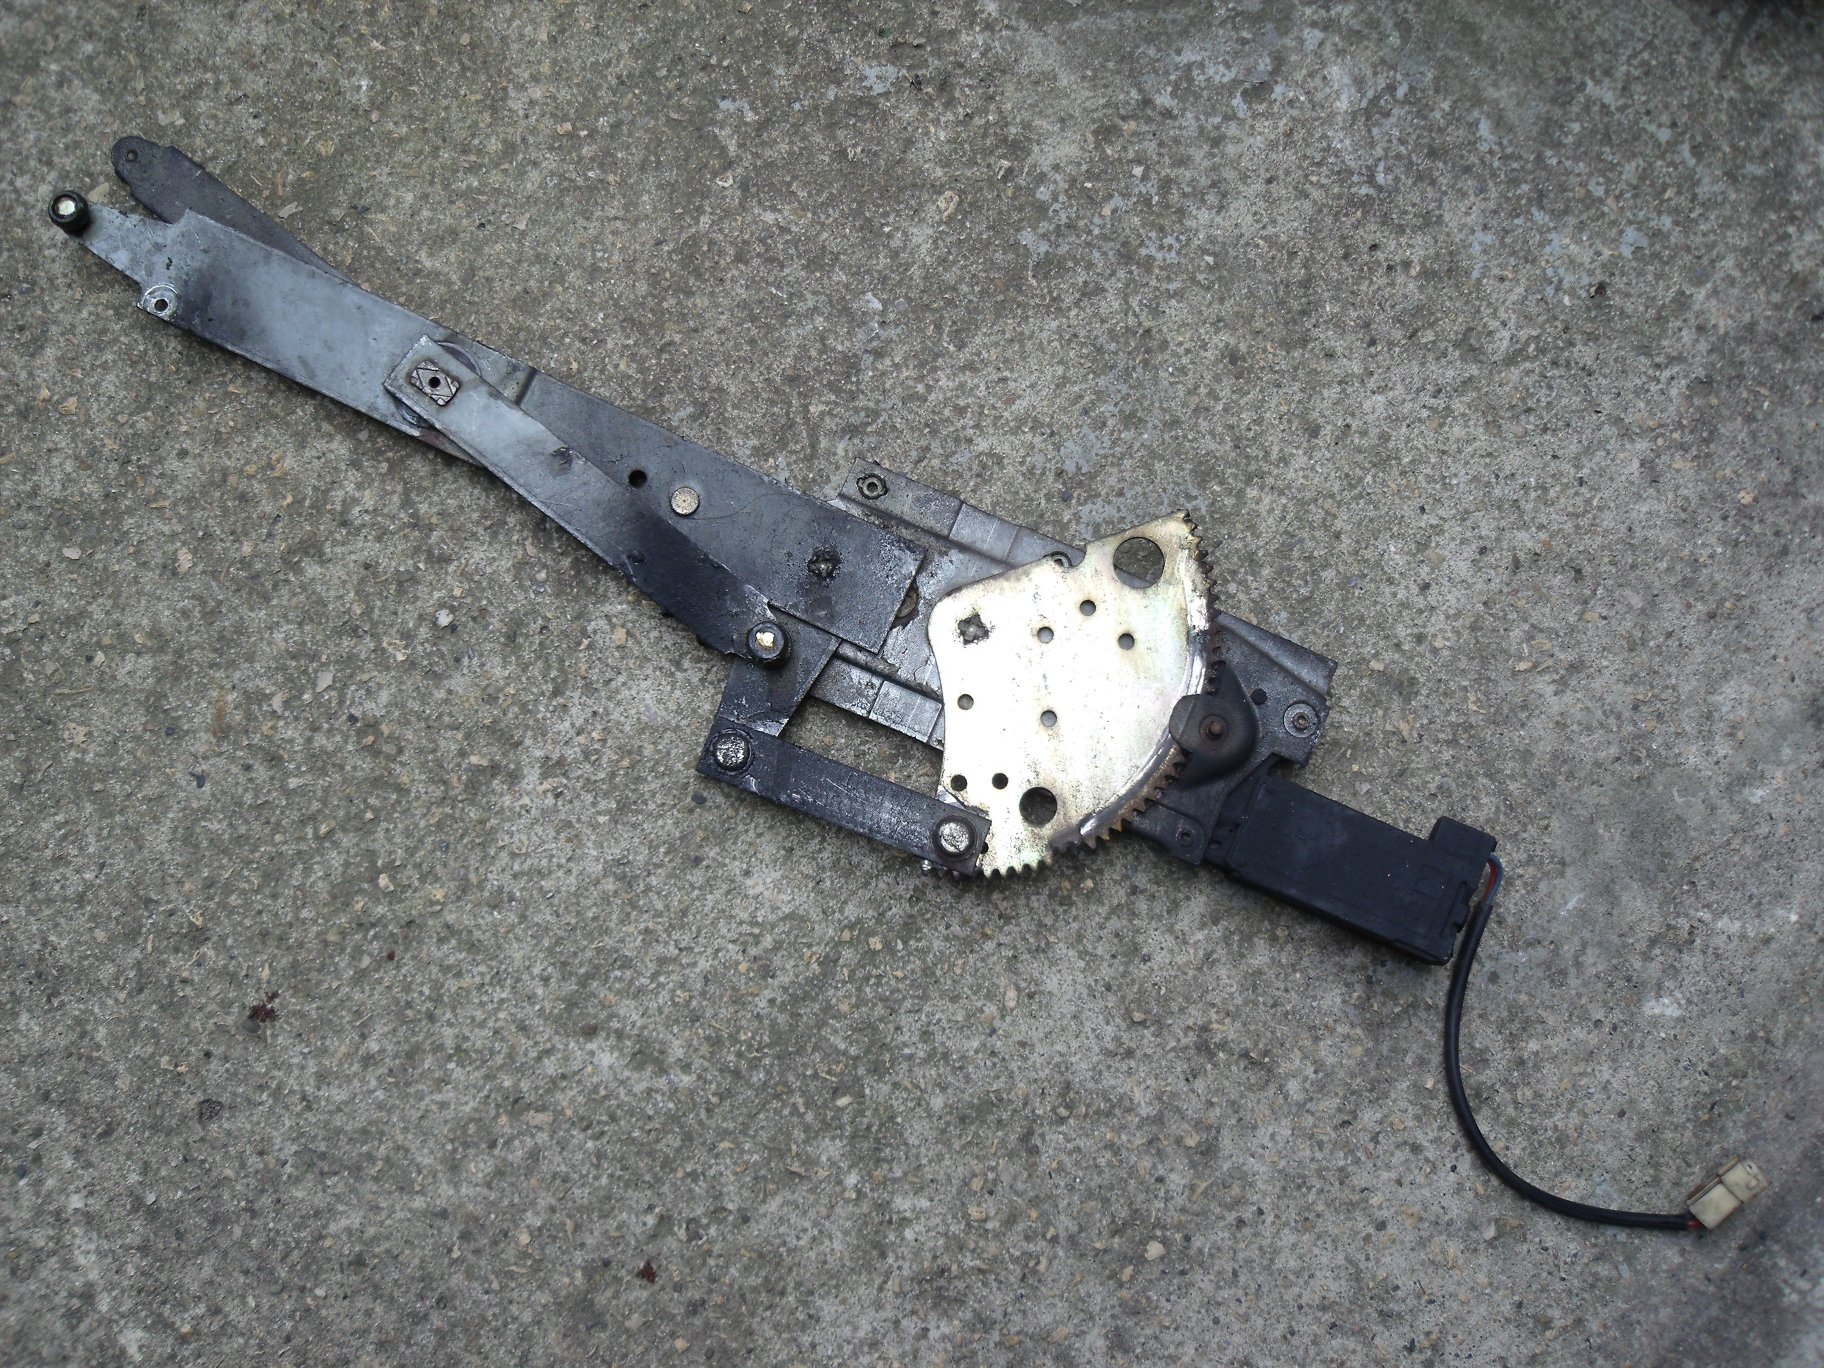
The window-lift mechanism (taken from the Rover SD1!) looks like this once removed from the door:
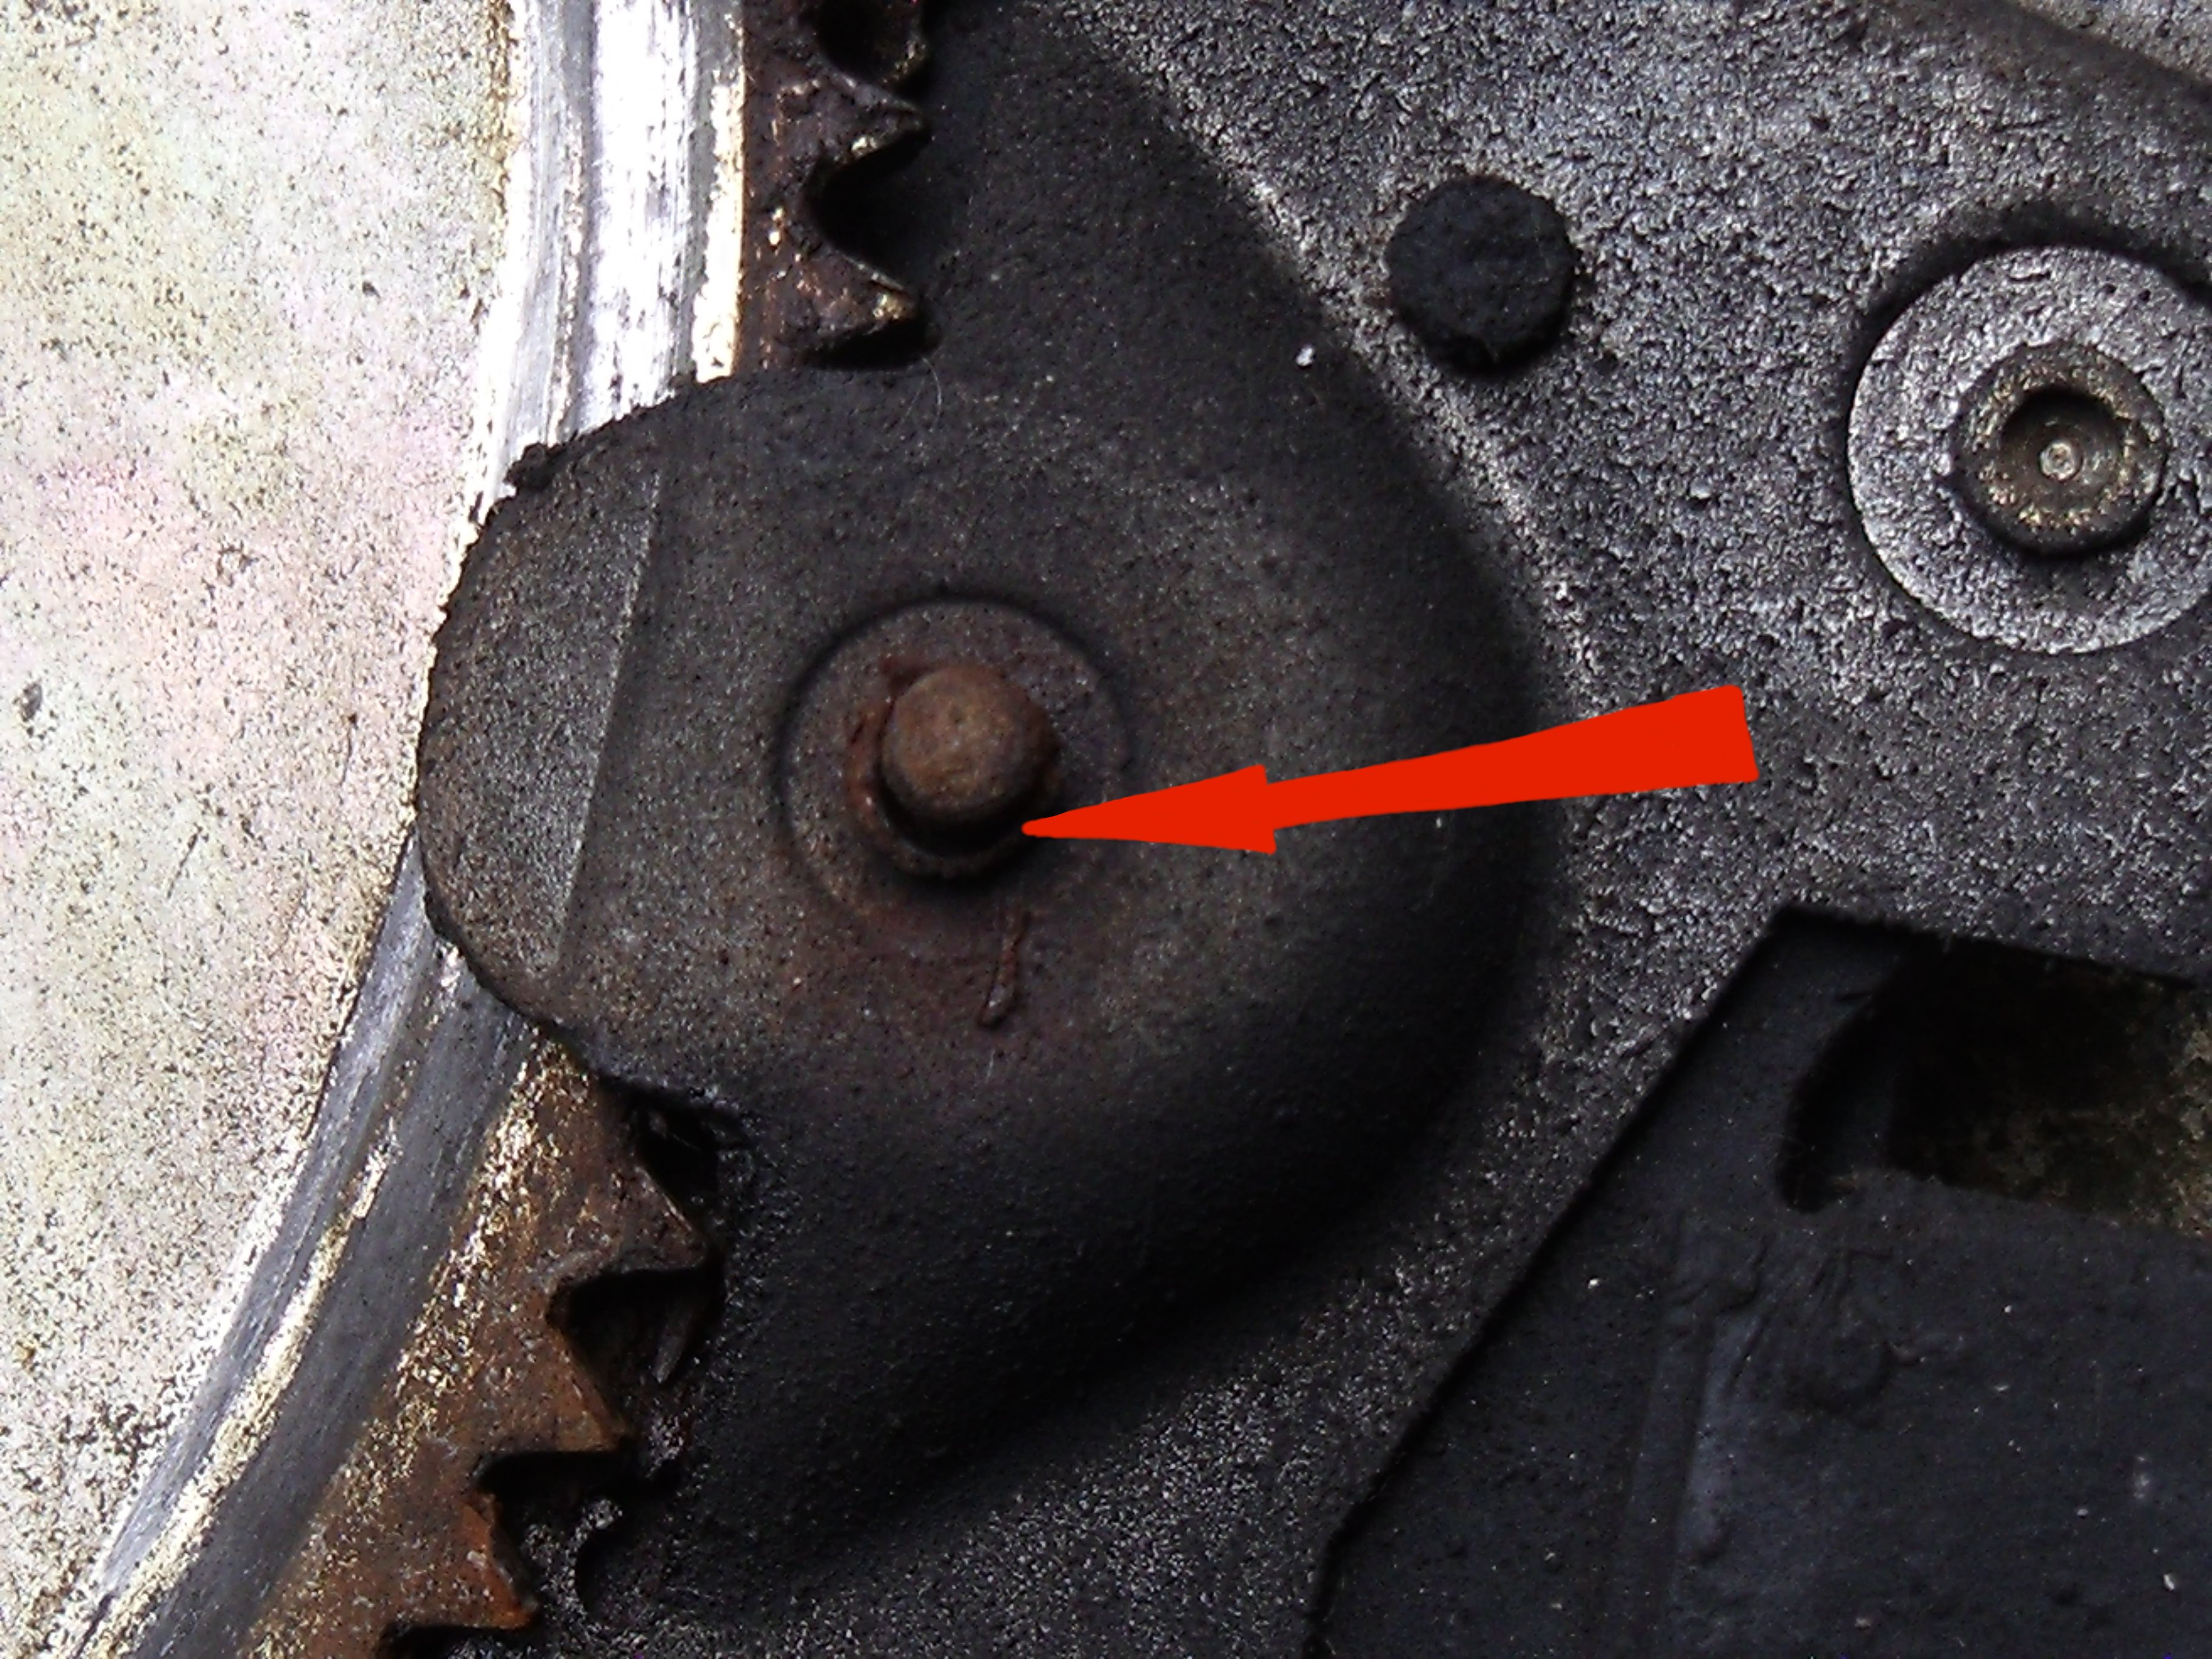
One point to watch out for is the pinion pivot; if you notice a lot if juddering when the window is being lowered, but lifting is OK, check the condition of the pivot. It's a simple arrangement of a shaft turning in a pressed metal 'bush', but once it wears as in the picture below, repair is probably impractical:
New replacement window lift mechanisms are still available from Rimmer Bros. as of march 2013; they can also be found via online auctions.